Enable preset signals
Signals are preset classifier monitors that automatically score production traces for common quality issues and error categories. Each signal uses a benchmarked LLM prompt to classify traces as binary labels (true/false) with confidence scores and reasoning. Signals require no prompt engineering or scorer configuration. Enable signals from the Monitors page to start classifying traces immediately. Signals use a W&B Inference model to score traces, so no external API keys are required.Available signals
Weave provides 13 preset signals organized into two groups.Quality signals
Quality signals evaluate successful root-level traces for output quality and safety issues.| Signal | What it detects |
|---|---|
| Hallucination | Fabricated facts or claims that contradict the provided input context |
| Low quality | Responses with poor format, insufficient effort, or incomplete content |
| User frustration | Signs of user frustration such as repeated questions, negative sentiment, or complaints |
| Jailbreaking | Prompt injection and jailbreak attempts that try to bypass safety guidelines |
| NSFW | Explicit, violent, or otherwise inappropriate content in inputs or outputs |
| Lazy | Low-effort responses such as excessive brevity, refusals to help, or deferred work |
| Forgetful | Failure to use context from earlier in the conversation, ignoring previously stated facts or instructions |
Error signals
Error signals categorize failed traces by root cause to help you identify and resolve infrastructure and application issues.| Signal | What it detects |
|---|---|
| Network Error | DNS failures, timeouts, connection resets, and other connectivity issues |
| Ratelimited | HTTP 429 responses, quota exhaustion, and throttling from upstream APIs |
| Request Too Large | Requests exceeding size or token limits, such as context window exceeded |
| Bad Request | Client-side errors where the server rejected the request (4xx except 429) |
| Bad Response | Invalid, unexpected, or unusable responses from remote services (5xx) |
| Bug | Flaws in application code such as KeyError, TypeError, or logic errors |
Enable signals from the Monitors page
To enable signals:- Open the W&B UI and then open your Weave project.
- From the Weave side-nav, select Monitors.
- At the top of the Monitors page, a row of suggested signal cards appears. Each card shows the signal name, a description, and an Enable button.
- To enable a single signal, select the Enable button on the signal card. The signal begins scoring new traces immediately.
- To enable multiple signals at once, select the Add signals button. This opens a drawer that lists all available signals grouped by category (Quality and Error). Select the signals you want to enable, then select Apply.
Manage active signals
To view or remove active signals:- From the Monitors page, select the Manage signals button (gear icon). This opens a drawer listing all currently active signals grouped by category.
- Hover over a signal and select the Remove button (trash icon) to disable the signal.
How signals work
Each signal uses an LLM-as-a-judge approach to classify traces:- Trace selection: Quality signals evaluate successful root-level traces. Error signals evaluate failed traces. Child spans and intermediate calls are not scored.
- Prompt construction: Weave constructs a prompt that includes the trace metadata, inputs, outputs, exception details (if any), and the operation’s source code. The signal’s classifier prompt is appended with instructions for the specific issue to detect.
- LLM scoring: A W&B Inference model evaluates the trace and returns a structured JSON response with:
- A binary classification (whether the issue was detected)
- A confidence score (0.0 to 1.0)
- A reason citing specific evidence from the trace
- Result storage: Results are stored as feedback on the Call object and are queryable from the Traces tab.
Signals compared to custom monitors
| Signals | Custom monitors | |
|---|---|---|
| Configuration | One-click enable, no prompt writing | Full control over scoring prompt, model, and parameters |
| Scope | Preset quality and error classifiers | Any evaluation criteria you define |
| Trace selection | Automatic (successful root traces for quality, failed traces for errors) | Configurable operations, filters, and sampling rate |
| Model | W&B Inference (preset) | Any commercial or W&B Inference model |
| Use case | Quick production monitoring with proven classifiers | Custom evaluation criteria specific to your application |
How to create a monitor in Weave
To create a monitor in Weave:- Open the W&B UI and then open your Weave project.
- From the Weave side-nav, select Monitors and then select the + New Monitor button. This opens the Create new monitor modal dialog.
-
In the Create new monitor menu, configure the following fields:
- Name: Must start with a letter or number. Can contain letters, numbers, hyphens, and underscores.
- Description (Optional): Explain what the monitor does.
- Active monitor toggle: Turn the monitor on or off.
- Calls to monitor:
- Operations: Choose one or more
@weave.ops to monitor. You must log at least one trace that uses the op before it appears in the list of available ops. - Filter (Optional): Narrow down which calls are eligible (for example, by
max_tokensortop_p). - Sampling rate: The percentage of calls to score (0% to 100%).
- Operations: Choose one or more
- LLM-as-a-judge configuration:
- Scorer name: Must start with a letter or number. Can contain letters, numbers, hyphens, and underscores.
- Score Audio: Filters the available LLM models to display only audio-enabled models, and opens the Media Scoring JSON Paths field.
- Score Images: Filters the available LLM models to display only image-enabled models, and opens the Media Scoring JSON Paths field.
- Judge model: Select the model to score your ops. The menu contains commercial LLM models you have configured in your W&B account, as well as W&B Inference models. Audio-enabled models have an Audio Input label beside their names. For the selected model, configure the following settings:
- Configuration name: A name for this model configuration.
- System prompt: Defines the judging model’s role and persona, for example, “You are an impartial AI judge.”
- Response format: The format the judge should output its response in, such as a
json_objector plaintext. - Scoring prompt: The evaluation task used to score your ops. You can reference prompt variables from your ops in your scoring prompts. For example, “Evaluate whether
{output}is accurate based on{ground_truth}.”
- Media Scoring JSON Paths: Specify JSONPath expressions (RFC 9535) to extract media from your trace data. If no paths are specified, all scorable media from user messages will be included. This field appears when you enable Score Audio or Score Images.
- Once you have configured the monitor’s fields, click Create monitor. This adds the monitor to your Weave project. When your code starts generating traces, you can review the scores in the Traces tab by selecting the monitor’s name and reviewing the data in the resulting panel.
feedback field.
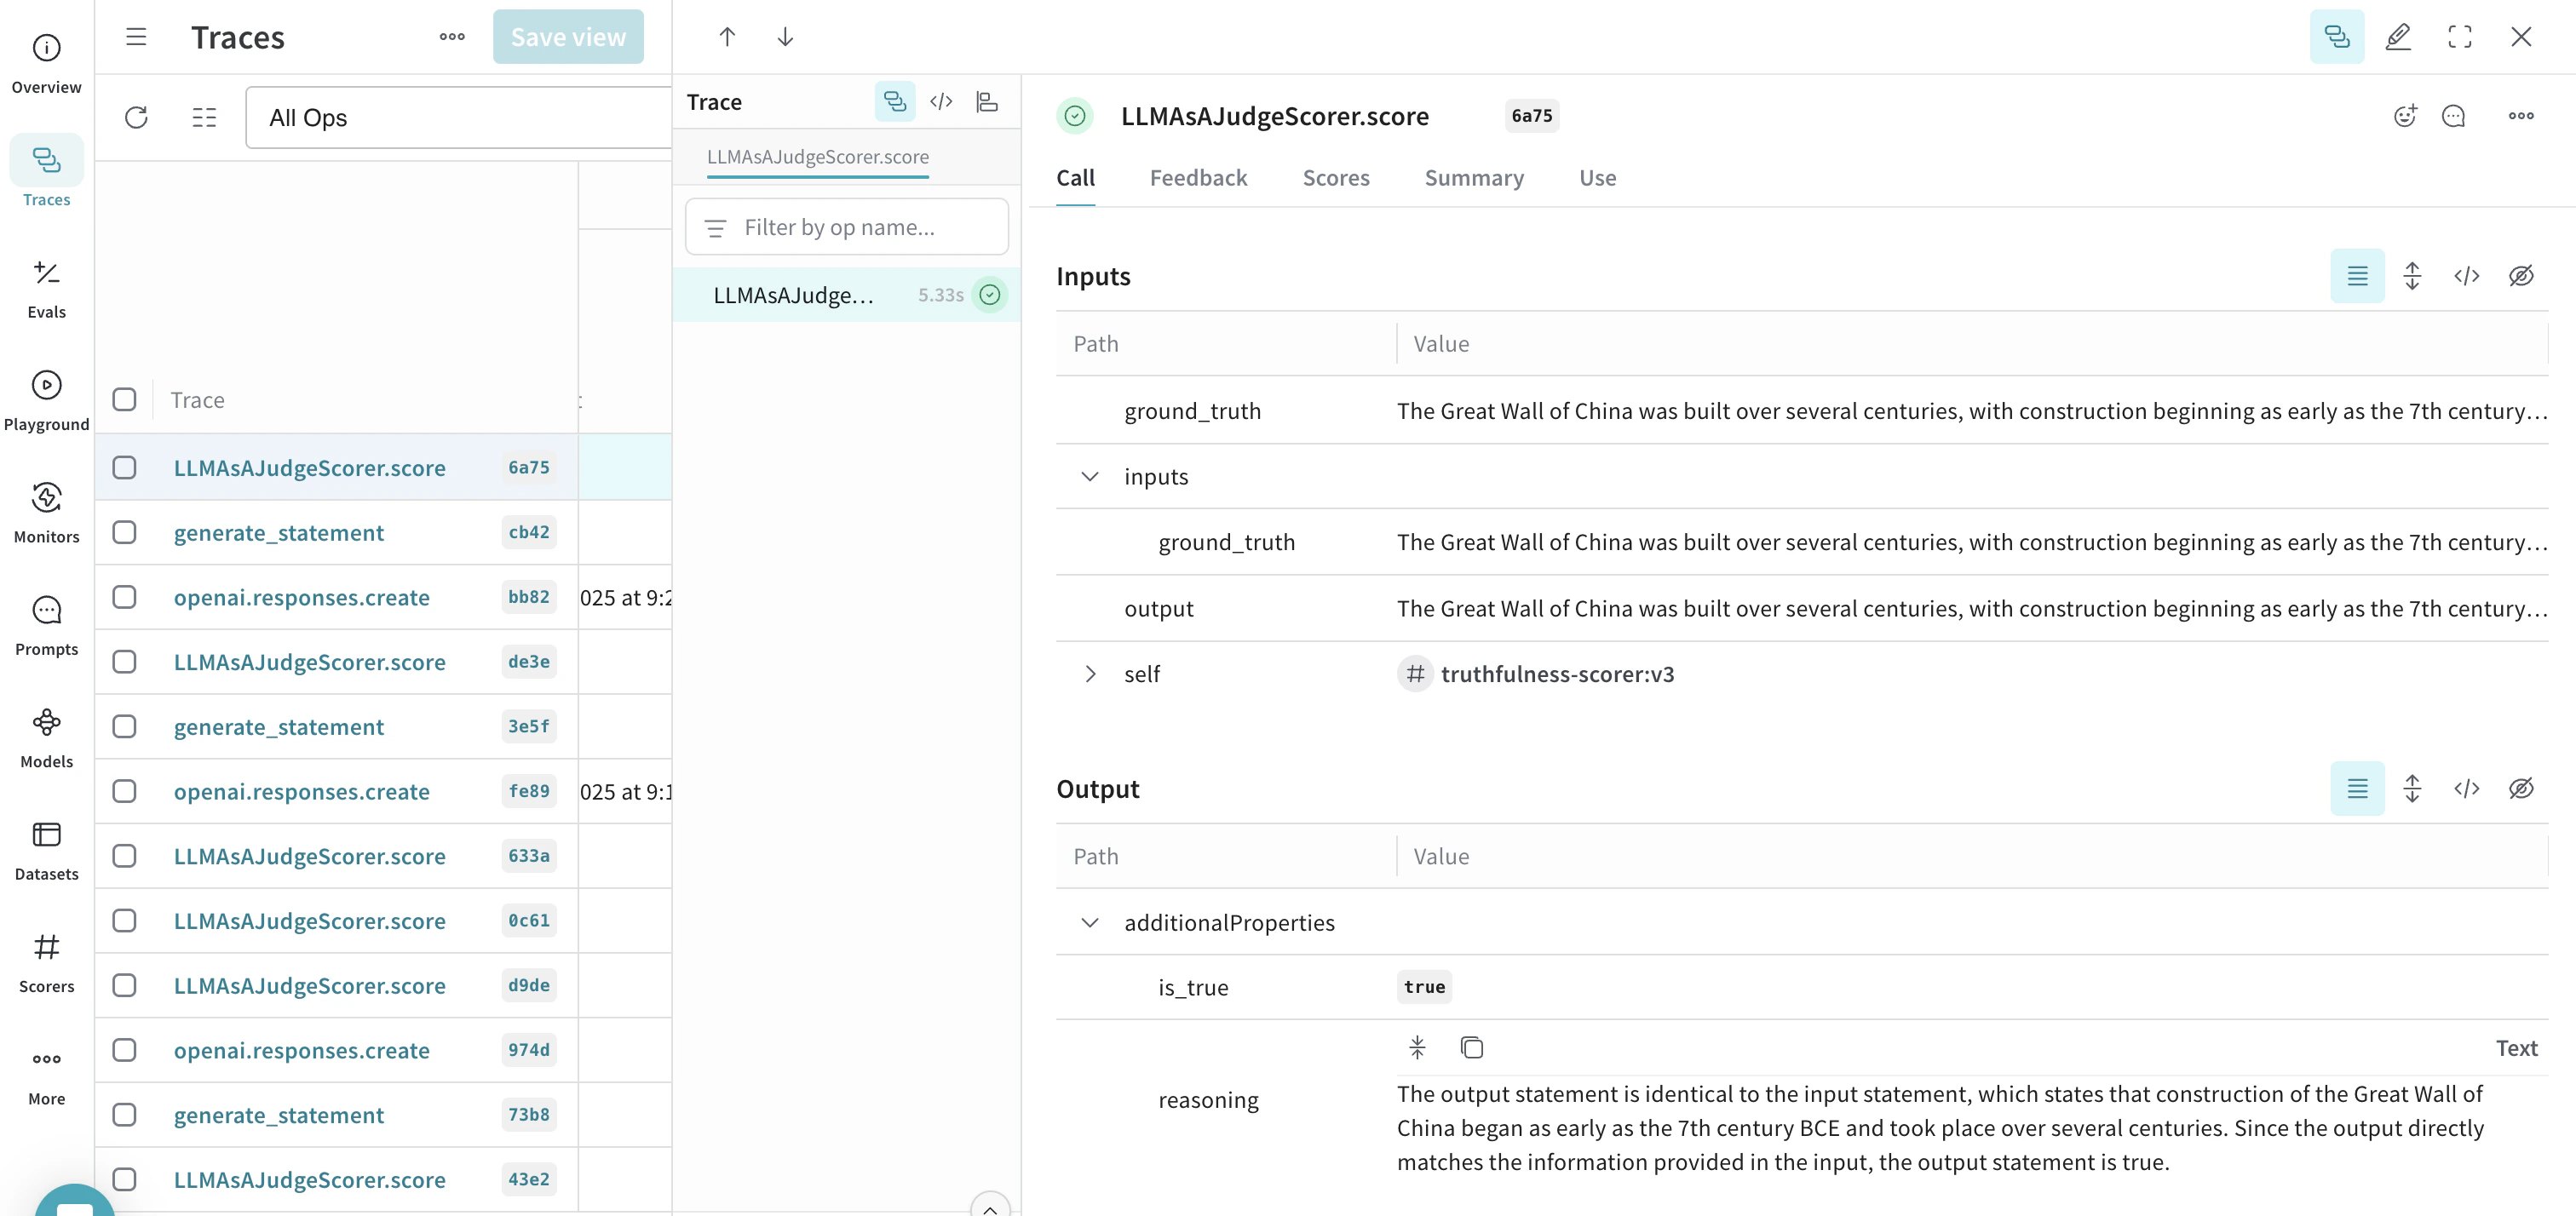
Example: Create a truthfulness monitor
The following example creates a monitor that evaluates the truthfulness of generated statements.- Define a function that generates statements. Some statements are truthful, others are not:
- Python
- TypeScript
- Run the function at least once to log a trace in your project. This makes the op available for monitoring in the W&B UI.
- Open your Weave project in the W&B UI and select Monitors from the side-nav. Then select New Monitor.
-
In the Create new monitor menu, configure the fields using the following values:
- Name:
truthfulness-monitor - Description:
Evaluates the truthfulness of generated statements. - Active monitor: Toggle on.
- Operations: Select
generate_statement. - Sampling rate: Set to
100%to score every call. - Scorer name:
truthfulness-scorer - Judge model:
o3-mini-2025-01-31 - System prompt:
You are an impartial AI judge. Your task is to evaluate the truthfulness of statements. - Response format:
json_object - Scoring prompt:
- Name:
- Click Create Monitor. This adds the monitor to your Weave project.
- In your script, invoke your function using statements of varying degrees of truthfulness to test the scoring function:
- Python
- TypeScript
- After running the script using several different statements, open the W&B UI and navigate to the Traces tab. Select any LLMAsAJudgeScorer.score trace to see the results.